Aesthetics and Durability: How Eco Slate Compares to Traditional Summerhouse Roofing Options
Summerhouses are an important element to many gardens. They are part of the gardens beauty as well as being a place to relax, socialise or escape to practice an engaging hobby.
In contrast to a shed roof a summerhouse roof is very much on display. So, a much wider variety of roof styles and roofing materials are used for summerhouses. Top of the list is cedar shingles, followed by felt shingles and then possibly clay tiles or natural slate.
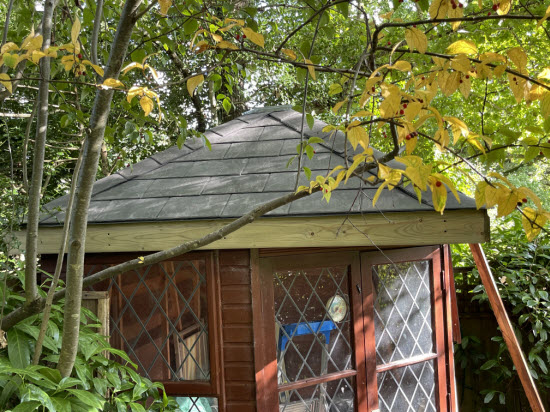 Nice looking Eco Slate summerhouse roof
Eco Slate is a new contender in the summerhouse roofing market
If you are in the process of choosing a new summerhouse or considering a roof replacement for an existing one, then this review of Eco Slate and a project example should be helpful.
Known for its durability and visual appeal, Eco Slate brings a new and appealing option to summerhouse roofing. In the following sections, I'm going to discuss the key benefits of Ecoslate, its distinctive features, and how it actually works on site by going through a recent project.
What is Eco Slate?
Eco Slate is a roofing tile made from recycled plastic. It has been manufactured to look like natural slate. The mould has features on the weather surface to mimic that of slate and the edges are 'riven' to look like traditionally worked slates.
I found out about Eco Slate initially from customers, who had most likely seen Kevin McCloud talking about them on Grand Designs. After a bit of research and using them on a couple of projects I soon became a fan. These are the main features of Eco Slate and how I find them.
Aesthetic appeal - a close resemblance to real slate
Whilst up-close Eco Slate isn't going to fool anyone that they are genuine slate. The overall appearance from a slight distance is excellent. They have depth and a matt finish. The riven edges break up the perimeter of the tile. The tiles are all of the same size, so there isn't the variability that you get with cedar shingles, but slate roofs are fairly uniform too. I have only worked with the classic grey colour slates, but they also come in green (to mimic Westmorland slates) and also red (not so common in the UK but natural red slate is quarried in the U.S. state of Vermont.
Overall the slates mimic the look of real slate quite well, giving a quality to look to any garden building.
Eco Slate's longevity - how will it hold up over time?
This is always one of my top considerations, Eco Slate are designed to last for 50 years or more. They have undergone various tests by the manufacturer to make sure that this new product should have some hope of reaching its half century. The tiles certainly feel durable and well, thick plastic is certainly something that isn't renowned for degrading quickly! The tiles are designed to be resistant to impact damage, hail and high winds.
The material varies in how flexible it is dependant on the temperature. At relatively warm temperatures, say 20 degrees C they are quite flexible. As the temperature drops they become more rigid. In summer and when subject to warmer temperatures the tiles bond together to form an impermeable layer. This should certainly help to resist wind driven rain.
Time will tell if they actually do live up to their promise, but they do look good to me.
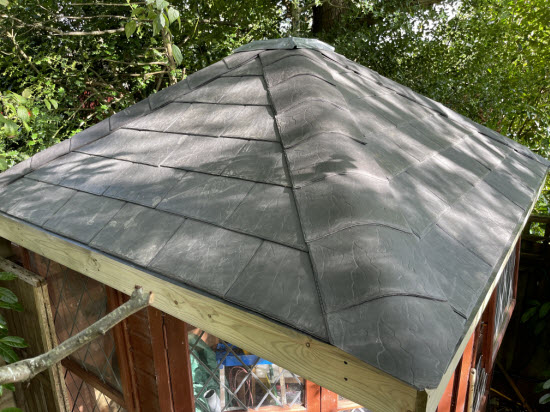 View of ridge detail on Eco Slate roof
Let's look at the cost-effectiveness of Eco Slate vs. traditional materials
At around £50/m2 the material cost of Ecoslate is approximately half that of cedar. But also, it is also more than bitumen shingles that come in at £10/m2.
However, initial cost is only part of the equation. Cedar and Bitumen shingles both have a life expectancy of 12-15 years in the UK. So when you look at the whole life cost, Eco Slate looks pretty good, especially when you factor in labour and maintenance costs for replacing and repairing buildings with cedar or bitumen shingles more frequently.
Is Eco Slate a low maintenance roofing option?
Eco Slate roof slates will require very little maintenance over their lifespan. They don't need to be treated with chemicals or coated with protective sealants like other types of roofing materials. The main thing to consider is making sure that the nails used to fix them are galvanised so these aren't the weak link in the chain.
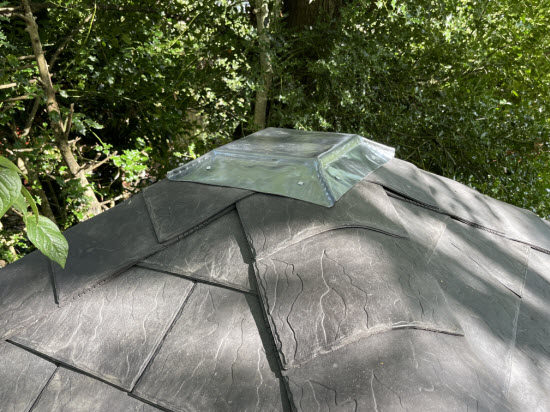 View of Eco Slate where four roof ridges meet
We now move on to the more marginal benefits for buildings such as summerhouse roofs
Eco Slate roof slates are much lighter than traditional slate tiles. Whilst this might be beneficial if you have an older home or a building with weak rafters. For small buildings such as summerhouses the weight saving over other materials isn't really a factor.
Is Eco Slate Environmentally friendly?
Eco Slates are made from recycled materials, which helps to reduce waste and conserve natural resources. I don't really know about this one, I suppose it is good. But what happens to the tiles at the end of the day. I hope that when they are put in the plastic recycling bin they are actually recycled. It probably is better to use recycled plastic than cut down old Canadian Western Red Cedar trees and transport them half way round the world. Or to use 3 to 4 sets of bitumen shingles for every one of eco slate. So, in comparison to the alternatives they do sound to be a positive for the environment.
We've chatted enough about the properties of Eco Slate and how they work in theory. What are Eco slates like to work with onsite?
Using Eco Slate on a summerhouse roof
This summerhouse was relatively small at 8'x6' and had an extended octagonal roof. With a roof pitch of 25 degrees. The old timber roof covering had decayed exposing the roof felt beneath.
The summerhouse re-roofing project proceeded as follows:
The first step was to measure up the old roof to determine the surface area and therefore the quantity of shingles to order.
When calculating the number of packs make sure you get enough !
The Eco slate shingles are supplied in packs of 16 that cover approximately 1m2. This makes the initial calculation fairly straight forward. But you will also need to apply your own judgement depending on the shape of your roof. When shingling triangular roof panels, as we had on this project, then there will always be a fair amount of wastage. I allowed for an extra 15% over the minimum amount for this project.
Also make sure that you include an allowance for the number of tiles that you will need to use along the ridges, this comes up to quite a surprising number.
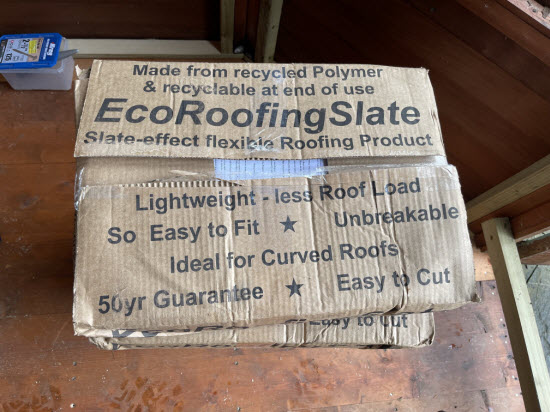 Eco Slates are supplied in cardboard packaging in packs of 16, which cover approx 1m2
I did a lot of the preparation work in my workshop
I find working in a more controlled workshop setting, at ground level is a lot quicker and results in better work than working on site and at height. Also it doesn't rain very much in my workshop!
I made triangular roof panels to the size that I had measured on my survey. The panels comprised 11mm OSB with a 2x1" pressure treated batten screwed around the perimeter. I covered each panel in Tyvek roofing membrane before fixing the tiles.
Things to remember when installing Eco Slate
Install a double row of tiles along the bottom of the panel with the joints offset. Very similar to many tiled and shingled roofs.
When you get to the second row the overlap is marked on the tiles. Select the amount of overlap dependent on the slope of the roof. The more slope, the less overlap.
Bear in mind the overall weight of the panel including the tiles. Mine were approx. 0.7m² so I could easily manhandle them on site and lift them into position by myself. Larger panels may need two people to lift.
I transported the panels to site for the start of work very easily in the back of my van.
Starting the re-roofing project
Any project starts with a surprising amount of preparation work. In this case it involved removing what remained of the old roof covering. Making repairs to rafters and replacing damaged plywood roof panels. All this, so that there was a solid base to work from.
Then I installed a layer of felt underlay on the roof deck. The purpose of this is to guarantee full protection underneath the newly installed system and to direct any water or condensation on the underside of the tiles back out at the eaves.
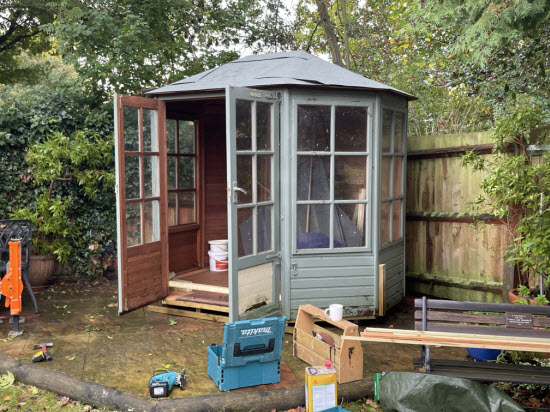 Roof ready for installing new roof covering
Now start to install the roof panels
I lifted the panels into position one by one and secured them to the rafters with 70mm screws, 2 No. per side. Making sure that each panel sat nicely on the roof and in relation to other panels.
Hopefully you made your initial measurements correctly and the panels fit together looking just like a Terry's chocolate orange.
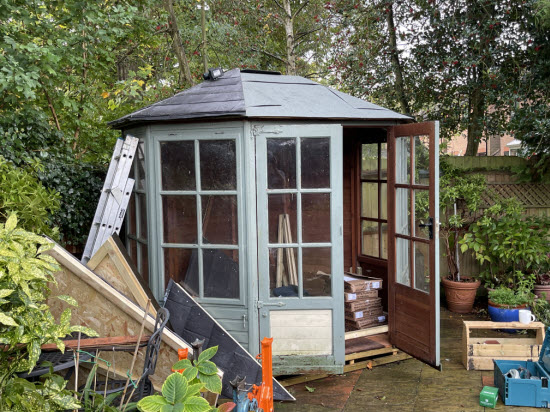 First roof panels installed
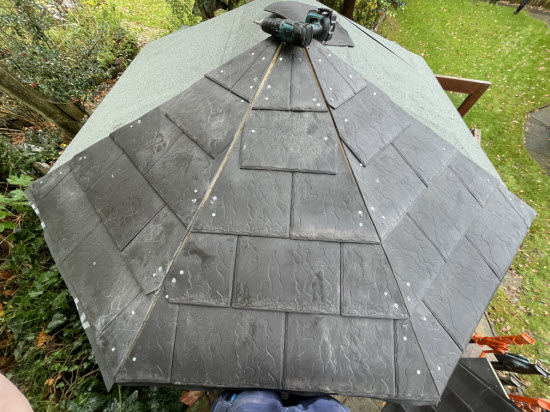 Close up with 3 panels in place
Waterproof the ridges
The ridge tiles can now be installed to water proof the panel joints and give a nice finished appearance.
Use longer nails for these as you are fixing through several layers of tile. The bottom tile is cut using a Stanley knife to align with the bottom edge of the roof. Tiles overlap each other so 0.2m is showing of each tile. The top tile will need to be cut to suit.
I have found the best way to seal the ridge or apex (when all ridges meet at a point) is to use code 4 lead.
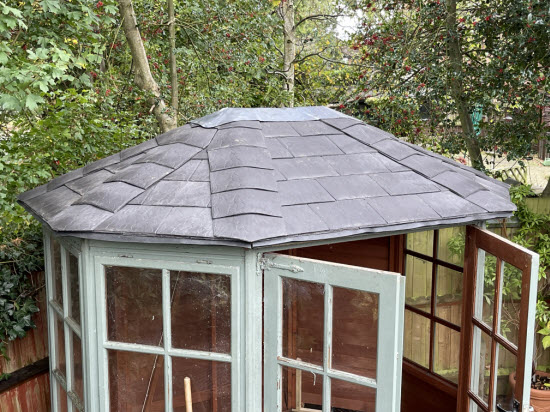 View of roof with ridge coverings and lead along the ridge
I don't have special lead forming tools but use a length of timber batten which I beat with a hammer to avoid getting unsightly hammer marks on the lead. The lead can quite easily be worked and 'persuaded' to look good. I usually fix with the same long clout head nails used for fixing the Eco Slates.
On completion, stand back and admire your work!
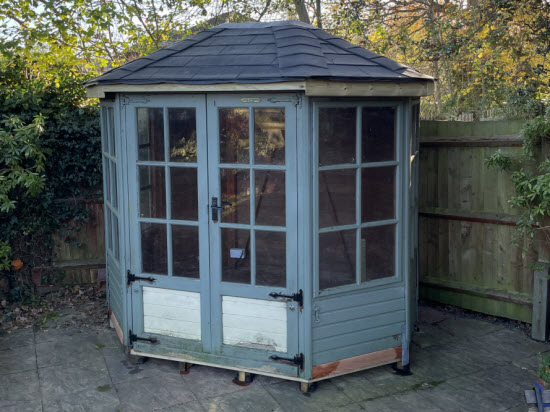 Eco Slates make a very solid job that makes a good impression and will last for many years to come!
Conclusion
Eco Slate is a relatively new product that holds a great deal of promise. After working with it on several projects I find that it really is a solid product that gives a distinctive look. And the tough recycled plastic slates create a kind of shell that really should withstand the toughest weather conditions.
In comparison to cedar shingles, Eco Slate is much easier and quicker to install due to its regular dimensions. It is slightly more difficult to work with than felt shingles as it is more difficult to cut. But this has the benefit that it should also be harder wearing!
With proper installation and maintenance, an Eco Slate roof should last for decades, providing you with peace of mind.

Keep in touch with our monthly newsletter
Shed Building Monthly


