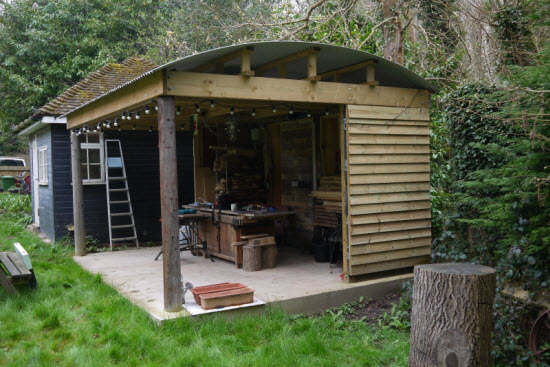
Which is the best Shed Roof Design for 2022?
Shed roof design is one of the things that I find most interesting about working with sheds. I have spent most of my adult life designing structures and so working out how to frame a shed roof to fit a particular roof style is a challenge that I enjoy.
When it comes to working out the joist sizes for a shed roof don't get too carried away with getting the smallest size you possibly can. Having properly sized roof timbers will give you a roof that will last and that you can be proud of.
Many commercial shed builders, building for the mass market, try to pare the timber sizes down to the smallest size possible (and beyond). As they are building lots of sheds per day, by saving a few pennies on timber they can add to their bottom line. However as you will quickly find out, the cost of timber for framing a shed forms a small part of the overall cost of your project, so my advice is not to skimp on timber sizes for framing your shed roof.
In the work I do repairing sheds, I frequently see the shortcomings of inadequate roof design as well as the damage that the weather and time can inflict on a roof. I often see how particular problems could have been avoided and more importantly I need to assess the load capacity of a roof to see whether I will risk climbing on top of it to make the repair!
What is the most common shed roof style?
The most common shed roof styles are:
I have reviewed each shed roof design below, along with pictures, a three dimensional sketch of the framing and the points for and against the shed roof type.
It is worth reviewing each design to see how they are framed. You can then decide which you are going to build for your project, based on a mixture of appearance and your own skills/expertise.
There is then a link to a more detailed article about how to make each shed roof.
Pent shed roof design
The pent roof shed is the simplest form of shed roof. It comprises a single roof slope, normally falling from the front to the back.
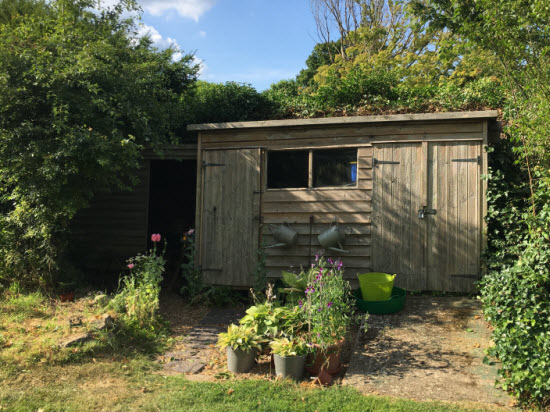 Nice looking pent roof shed
Height limitations encourage the use of pent sheds
The pent shed roof design is particularly popular in the UK, where planning regulations mean that most domestic sheds are effectively limited to a maximum height of 2.5m. By using a pent shed with a 'flat roof' the homeowner maximises the space inside the shed, whilst complying with local planning law.
By the way, the roof of a pent shed is never truly flat. A pent shed roof design needs a minimum fall of at least 1:60 to help water drain away.
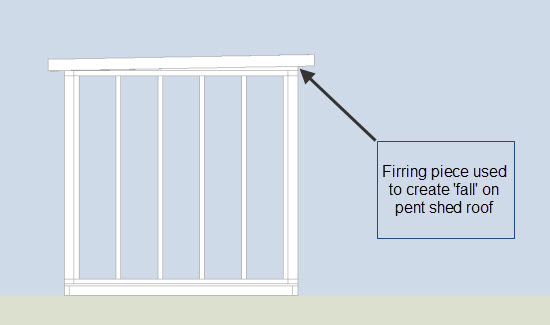 Using firring strips to create the slope on a pent shed roof
Framing of a pent roof shed is straightforward
The roof is framed by a series of roof joists spanning from the front to the rear wall. The size and spacing of the joists is governed by two factors: The type of roof deck that is used and the distance between the front and the rear wall.
The thickness of the roof deck is a minimum of 12mm. This is a lightweight roof deck and should be OK for joist spacing of 400mm. If you opt for a thicker roof deck you can open the joist spacing up to 600mm. This means that you use more material in the deck but less in the actual joists themselves.
The cost of one approach or the other is a bit of swings and roundabouts. With one way you spend more on roof deck the other way more on roof joists. It is a bit of a false economy trap as the cost difference between the two will be relatively small in relation to the amount you will be spending on the roof covering.
What sort of roof covering is best for a pent shed?
My current favourite pent roof covering is EPDM. This is an artificial rubber sheet that has three huge advantages:
It is supplied cut to the size of your roof (with a bit extra on each edge for overlapping the eaves). This means that there are no seams which would ultimately leak.
It is glued to the roof deck rather than nailed. This means that there are no holes in the roof membrane, each of which is a potential source of leakage.
It has a very long service life, probably 50 years +. EPDM has been proven in service on large industrial roofs over the last 50+ years. This means that you won't have to repair your shed roof every few years (or pay someone like me to do it for you!) it also means that the slightly higher initial of EPDM becomes the lowest of all roofing materials when looked at on a cost per year basis.
Pent sheds are a very practical shed roof design
Read more here about the details you will need to understand to construct a pent roof shed.
Gable shed roof design
The Gable shed roof design is the worldwide most popular form of shed roof. The roof slopes two ways from an apex. The apex can be central or offset.
There are three main ways of framing the Gable shed roof design:
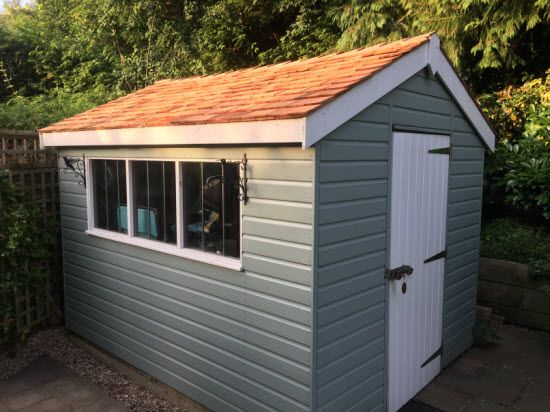 Nice looking gable roof shed with cedar shingles
The simplest is the roof beam. This type of roof uses a beam that spans from the peak of one gable end to the other. The rafters span from the wall and on to the ridge beam. Rafter and beam sizes depend on the dimensions of the building.
The rafter sizes are normally OK but as I travel around the country I see quite a few sheds where the ridge beam is undersized. This means that the beam deflects and pushes out the side walls of the shed. This can give a building a bit of 'character' but probably not so great if you are the owner/occupant of the shed.
The second method of framing a gable shed roof is to use roof trusses and purlins. For this method the trusses are spaced at a nominal distance apart and support beams that span between them. The purlins in their turn support the roof deck. This is a very efficient way to support roofs of all sizes.
Trussed rafters - this method of gable shed roof design makes each set of rafters into a lightweight truss. By tying the rafters across at eaves level you stop the deadly 'eaves spread' mentioned in method 1. You also create a useful storage platform above ceiling level where you can store surplus equipment and timber.
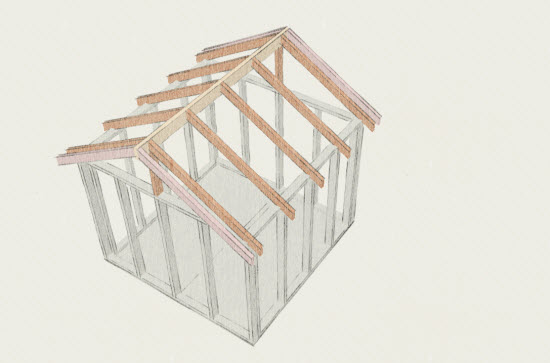 Framing a shed roof, with rafters spanning from eaves to a central ridge beam
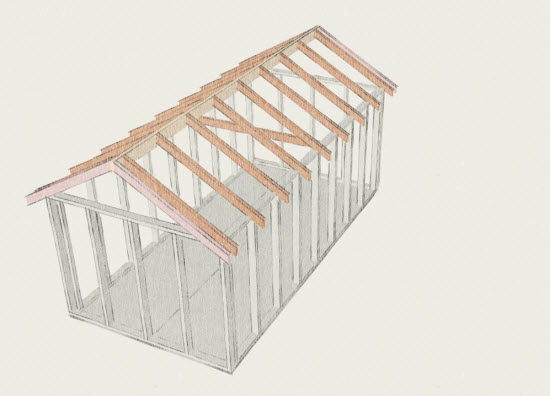 As a shed gets longer an a truss can be introduced at mid span to give the beam extra support
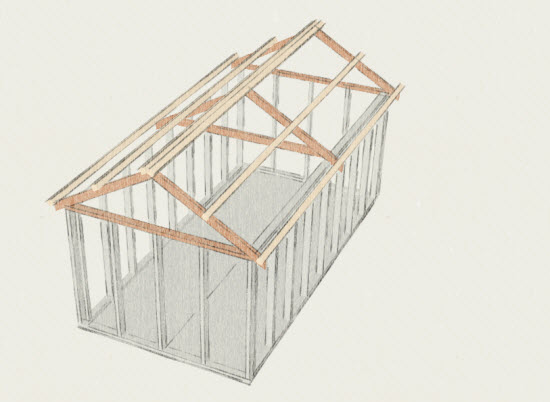 An alternative method of roof framing using purlins and roof trusses
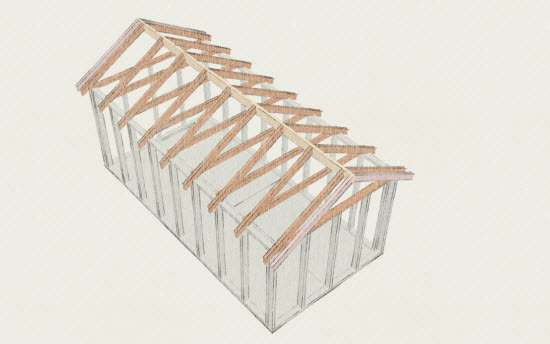 Roof framing with trussed rafters. Creates a useful storage space in the roof
I should stress that neither of these shed framing methods is better than any of the others. Each one has its strengths and weaknesses dependent on the size and use of the shed.
I go into each of these methods in more detail here
Shed roof slope is a useful factor to understand for gable shed roof design
Gable shed roofs have a wide variety of slopes from the almost flat at 5-10 degrees to steeply sloped at 45 degrees. The factor governing roof slope design are many from the local climate (a steep slope is good for encouraging water and snow to run/slide off) to the local architecture and planning regulations. This article will help you understand how roof slopes are specified.
Another useful factor to consider in a gable shed roof style are overhangs
Any roof will project past the wall that supports it. The size of these overhangs can be really useful to protect the base of the shed from water and also to provide a nice sitting area or covered deck for sitting out. Read more on shed roof overhangs
Gambrel shed roof design
The gambrel shed roof design isn't so popular here in the UK. But there is a big tradition of this style of shed in North America. The style developed from Dutch Colonial Architecture (link) where the roof style allowed hay and feed to be stored in the dry protected area under the voluminous roof whilst animals and equipment could be kept on the ground floor below.
In comparison to a traditional pitched roof the two slopes of the sidewalls allow a large volume of usable space to be enclosed.
The design has been developed for sheds into two main streams. The high and low roof gable shed.
The high roof gambrel shed remains true to the buildings roots being effectively a two storey building.
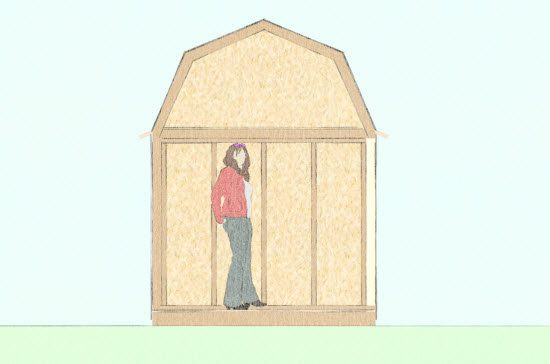 Cross section through a high roof gambrel shed. Look at all that loft storage above!
The low roof gambrel is bit of a hybrid in that it has the appearance of a gambrel shed but is only one space. The roof structure is formed by a series of 'arches' which are formed by joining rafters together with plywood gussets which are secured with glue and screws.
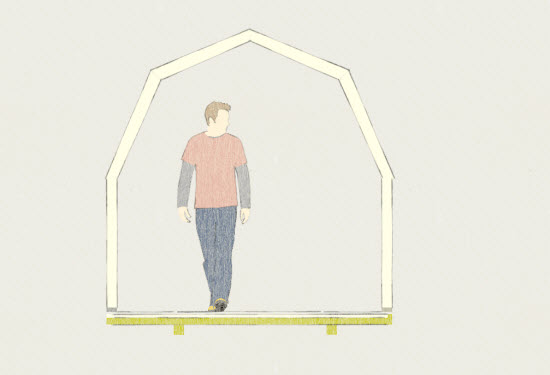 Cross section through a low roof gambrel shed. Nice roof line, but more space would be enclosed with a pent shed of equivalent height.
The low gambrel shed has less overall storage space than an equivalent pent shed. But in the right place it has more 'kerb appeal' than the more box-like pent roof shed.
I have expanded further on the Gambrel Shed here.
Hipped shed roof design
I have a bit of a weakness for the hipped shed roof design. Visually they appear less bulky than a gable shed and also with the various ridges they have more elements to draw the eye.
 A variety of sheds with hipped roofs
Hip roof sheds are similar to gable roof sheds but the end-wall slopes in so that all four faces of the roof slope towards the ridge. This makes them geometrically slightly more challenging to construct than your standard roof that only slopes in two directions.
The sloping ends of this shed roof design have a slight disadvantage in that they reduce the potential for storing stuff in the roof. As a consequence this style of shed roof is more commonly used for pool house sheds and summerhouses where roof storage is a less important criterion.
Hip roofs can be more difficult to waterproof as there is a greater length of seam to seal. And the junction where adjoining roof slopes abut is more complex to seal than the simple ridge joint on a gable shed.
But don't let this put you off, the challenge of constructing a hip roof can be met by most shed builders with a bit of experience and a powered mitre saw.
Why use a powered mitre saw?
To make a well built hip roof you will need to be able to cut accurate compound mitres. This means that the joint that you cut slopes in two directions at once. Rather than trying to mark out the timber with a pencil it is straight forward to set the angle between the two slopes of timber (45 degrees) and the slope of the shed roof then cut the end of the rafter.
The rafter can then be put in position and the location of the birdsmouth (where the rafter sits on the wall plate) which is much more straight forward to mark (and cut using a hand saw) can be marked.
I know you will enjoy building a hip roof shed
So click on this link to find out more about hipped roof shed design.
Saltbox shed roof design
The salt box roof shed originated as a fisherman's shed and was designed for its simplicity and strength to resist the wind coming in from the sea. This shed roof design is not symmetrical, one of the eaves is a lot lower than the other. The design is an extension of the gable roof with one side of the roof forming a 'lean-to' extension or 'cat-slide' roof.
The saltbox style roof is similar to that of the hip roof shed but the roof design is not symmetrical. The name 'saltbox' originates from the similarity of the appearance of the shed to an old fashioned salt storage box.
This type of shed roof style developed from a regular gable roof shed with a side extension. The side extension sometimes has the space enclosed within the volume of the building.
Sometimes the extension is formed as a 'lean to' extension and is used for the storage of logs or other outside equipment.
Many orthodox saltbox sheds have the continuous roof slope all at the same pitch, but many make the extended section of the roof shallower to preserve headroom in the enclosed space.
In terms of framing a saltbox shed the principles are similar to the gable shed. The main difference being how the extended roof slope is supported.
Curved shed roof design
The curved shed roof design has a real visual appeal. There are not too many immediately apparent structural advantages but they are worth considering just for their visual appearance.
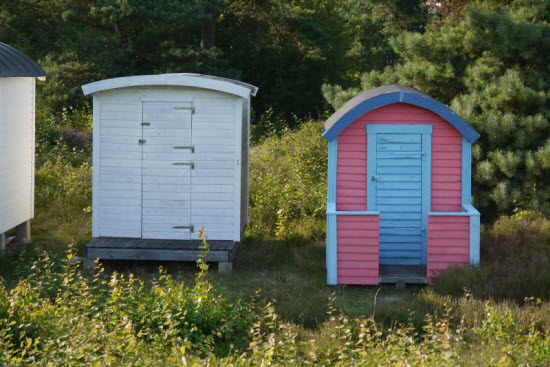 A couple of nice looking curved roof sheds.
Two straightforward ways of framing a curved shed roof are to either use pre-curved steel sheets supported on purlins or to use curved trusses/rafters to support a plywood roof deck:
Corrugated steel sheets can be ordered curved to the radius that suits your project. The sheets are passed through a rolling machine in the suppliers works so that they are smoothly bent to a specific radius that you specify.
Depending on the size of your shed you can have the sheets supplied in a single length (they are normally just under a metre in width) or for handling reasons on larger sheds you might want one or more sheets. The sheets are supported by the roof structure underneath.
 Curved roof formed from curved metal roof sheets supported on purlins
For the curved shed roof design in the picture, my friend Mike built a pole shed with a flat support structure, he then built up off the structural beams to support the curved roof sheeting. The curved steel roof sheets are fixed through the steel sheet with self-tapping/self-drilling screws that have an EPDM washer built-in beneath the head to seal around the screw hole. Remember to fix through the top of the roof sheet and not in the trough of the corrugation.
The second method of forming a curved roof is to create a curved support structure. Dependent on the curve you want this could be a straight rafter with a curved firring piece fixed to the top surface, a series of joists with the top surface cut to the required curve or even a curved rafter comprised of sections of plywood glued together. Commercial sheds use steam bent timber of glued laminated beams to give a very slick look.
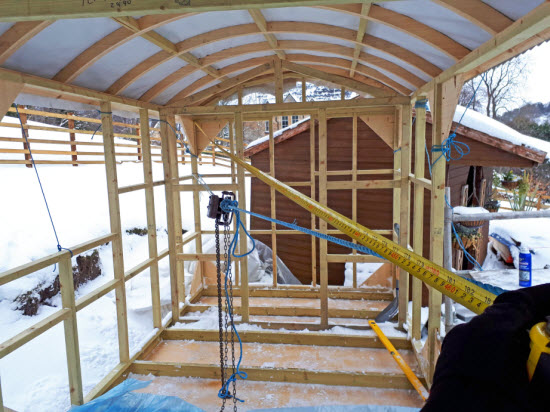 Curved roof on a shepherds hut formed with curved timber roof beams
Whichever method you use to create your curved support structure you can then screw the plywood decking to the rafters to form the roof structure. EPDM and roofing felt are both really suitable for diy methods of waterproofing curved shed roofs. But a standing seam metal roof can also be used as you can see in the pictures.
Summary
I hope that you liked the discussion on shed roof design that I shared with you here and followed the links to the more detailed design information for the shed design that interested you the most.
The three most popular shed roof styles are:
- Pent roof
- Gable roof
- Gambrel roof
- Do you want an easy, simple way to learn more about building sheds?
- Keep up with the top answers and tips to shed building questions from our Mini-forum.
- Would you like a FREE, downloadable, virtual shed?
The hipped roof shed design is more commonly used on summerhouses and pool house sheds
The curved roof is used on shepherds huts and beach huts
The saltbox roof is often built to re-create a seaside type feel or arrived at by accident when a more standard gable shed is extended to the side.
Once you have made the big decision as to the style, geometry and framing of your shed roof, you will need to make many detailed decisions relating to the shed roof construction details and the type of shed roofing that you will use.
Don't forget to sign up for Shed Building Monthly for the latest shed building tips and stories.
Are you looking for a way to easily find out more about shed roofs and a 'shed load' of other shed knowledge?
If you answered Yes! to any of these questions then pop your contact details in the box below to keep updated with all the latest from this site.
Once a month, on the first of the month.
One final point, I will soon be launching a FREE online shed building course. Filling in the above form will make sure that you don't miss this valuable opportunity!
Your email address will be kept confidential and won't be shared.
Easily unsubscribe at any
time. I hate Spam as much as you do!
Related posts:

Keep in touch with our monthly newsletter
Shed Building Monthly
